
10 steps for creating your own DCU email signature
1. Open your email and click on the cog icon on the top right hand corner.
2. Click the See All Settings button at the top.
3. Scroll down to Signature. If No Signature is selected, than select the button below this to turn signature on. Ensure the Sans Serif font is selected on the lower left of the signature box.
Add your required text
4. Please note your email signature must be displayed in both Irish and English, with Irish being displayed first. A list of translations for most terms is available here. For help with a translation of your email signature details, please contact oifigeach.gaeilge@dcu.ie. Más mian leat na sonraí Gaeilge a dheimhniú linn, gabh i dteagmháil le oifigeach.gaeilge@dcu.ie.
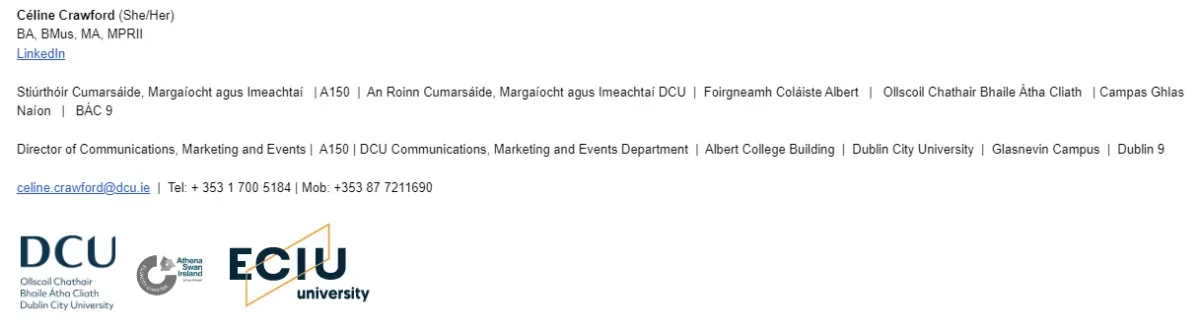
5. Type in your required standard details in the following format:
Name in bold
Ról acadúil, riarcháin | Rannóg acadúil, riarcháin | Seomra | Foirgneamh | Ollscoil Chathair Bhaile Átha Cliath l Campas | BÁC 9
Academic or administrative role | Academic or administrative area | Office Room No. | Building | Dublin City University | Campus Name | Dublin 9
email@dcu.ie | Tel: + 353 0000 000
6. Optional additions to your standard details in text may include the following:
- Pronouns (if included, add on the top line after your name)
- Academic qualifications
- Membership of professional boards
- Department, Faculty or Research Centre accreditation details
- A hyperlink to your LinkedIn account webpage
- A hyperlink to recent publications (to include books or research papers)
Add your required graphic logos
7. Each email signature must include these three logos:
- DCU logo
- Athena Swan Silver award logo
- ECIU University logo
Please note you can add additional accreditation graphic logos if required by your Faculty, department or research centre.
8. First, right click on the URL below and select 'Copy link address'.
- Right click here to 'Copy link address' for the Athena Swan logo.
- Right click here to 'Copy link address' for the ECIU logo.
Select the area you want the image to appear in your signature window and then press the Insert Image button (the graphic of a picture on the menu bar below your signature). You can then paste the image URL one by one. The logo will appear in the signature window - ensure you select small in the image size options.
9. Select the appropriate DCU logo from the list below - if your area is not listed, please use the DCU Official option. If you are a research institute or centre, please use the faculty to which you are aligned.
- Right click here to 'Copy link address' for DCU Official logo
- Right click here to 'Copy link address' for DCU Faculty of Science and Health
- Right click here to 'Copy link address' for DCU Faculty of Humanities and Social Sciences
- Right click here to 'Copy link address' for DCU Faculty of Engineering and Computing
- Right click here to 'Copy link address' for DCU Business School
- Right click here to 'Copy link address' for DCU Institute of Education
- Right click here to 'Copy link address' for Student Support and Development
- Right click here to 'Copy link address' for DCU Library
Right click on the relevant URL below and select 'Copy link address'. Select the area you want the logo to appear in your signature window and then press the Insert Image button (the graphic of a picture on the menu bar below your signature). You can then paste the image URL. The logo will appear in the signature window - ensure you select small in the image size options.
10. Scroll down to the bottom of your Settings window, and click save.